Tuesday, March 29, 2011

Home made compost bin


I Started my Home made organic garden a few weeks ago and it has been such a joy! There is just something amazingly fulfilling about working something with your own two hands. 
You take more pride in your work and put more value and tlc in it. It is a great why to teach your family to work together and what the fruits of your labor grow ( Literally)

I want to keep My garden Organic to save money, So I decided to make my own compost bin. 

It was sooooo Easy and It's great if you want to teach you kids about Earth science and recycling (home school moment) 

So Here's what you'll will need:

One plastic bin 
I had this one sitting in My garage

Make sure To wash it out


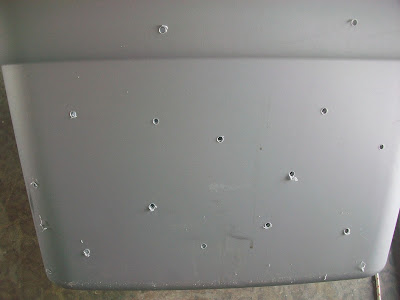
 You'll need a drill, I guess you could use a hammer and nail but that would take Forever and you will probably get frustrated and give up. So try to use a drill.


 Drill in lots of holes because compost needs air.


 The easiest rule of thumb is to mix in equal parts green stuff and brown stuff
Green stuff could be grass clipping or green leafs . Brown stuff could be dead  leafs


 You can add newspaper too. You'll want to add a layer of dirt as well. You throw in a few worms if you want to help out the process.

Last but not least... Food! You can add any can of organic matter to your compost bin. Any kind of fruit or veggie pealing. Any fruits or veggies that have rotted in your fridge any whole wheat bread or oatmeal. Egg shells, coffee grounds. Just so long as there is no meat, oil, or dairy in your pile. If you've added milk to you oatmeal , Your not going to want to use it. Meat and dairy will smell really bad when it decomposes.

You'll want to turn your bin every few weeks.

Most people think that compost piles smell and that you need lots of land to make one, well let me bust that myth. No they don't smell as long as you put the right things in them.

No you Don't need a lot of land at all. I have a little garden and this bin is just the right size for My yard .

Make sure to keep your bin moist and keep the lid on at night so you can keep city critters out of the bin.

Now this was just a starter lesson, If you want to know what to do next there are plenty of great tutorials on you tube! Here's a good one !  

So I hope composting isn't intimidating anymore, and remember compost is not just for veggie gardens, it's great for your flowers too ! Use what you have laying around your yard and kitchen instead of spending money on stinky fertilizers.


I'm linked up here!


this blessed nest


Photobucket

Friday, March 25, 2011

Mr. Man party tie tutorial

"Whatch'a doing Mr.Man" is such a cute theme for a little Boy's first Birthday!
One of My creative Besties decided on a Mr.Man party for Her little Guy.

I was all over it! You couldn't keep me away with a ten foot pole, LOL! I love planning parties form start to finish.
So I decided to Make Carter some "Man" Ties, to go with his new mustache 
J /K.

 I love these prints, I wish I had a boy....Maybe someday.


I started out with a template that my husband made for me, Then doubled the fabric and traced on the back side of the print.


 Then you'll need to stitch along the outline.


 Make sure to leave the top of the tie open, That is where you will turn it right side out. Then cut off the excess fabric.


 Then turn right sideout


 Use a pencil or something to poke all the edges out and iron for a more finished look.


To finish in off I sewed on elastic to go round the neck,  this way Carter can ware His ties with any shirt and not lose them. Okay I know this might not seem safe,  but If your child is waring one of these, Your obviously not going to let him hook him self up to anything, make sure to use a soft elastic for this project too.


Anyhoo, These were so much fun to make! I think I'm gonna make some for my girls, How cute would pink poke-a-dot ties be for girl!
Loves It!

P.s. I'll be posting pictures from the party next!

Photobucket

Wednesday, March 23, 2011

Fun kiddy Lunch

Ever since Target sold those Adorable little birdie cafeteria style plates, I have been inspired to make lunch time fun! I make sure to fill every spot on the plate with something yummy and Healthy.

My Girls are vegetarian and I had ran out of veggie dog's that day ( Yeah I know they Don't look eatable, but my kids love them! hahaha! ) so I used what I had.

Pb & J  Banana Dog's!


They were Soooo Good! I had one too.
They can be messy, But so fun!
You could try to put the Pb & J into squirt bottles and make in look more like
" ketchup and mustard " that would be so cute. You might want to cut them in half for smaller hands , my two year old  
had a hard time holding it. 

They made a mess! but it was too much Fun!!!
They were so grateful, They kept saying " Thank you mommy, your the best mommy!" hahaha! 

It made my heart smile.


Photobucket

Tuesday, March 22, 2011

Happy Spring!!!!

Happy Spring Everyone!!!!

In honor of spring I will be writing this post in pretty springy colors.
Yes I don't know what it is about spring and Easter but I go nuts planning for all the get together's, BBQ, summer camp outs, mother's and fathers day etc. 

And Easter! Don't even get me started! I am grateful everyday that Jesus Christ Died on the cross for me. But The whole month of Easter, I'm filled with joy! It's just a wonderful time to reflected and be amazed at how much We are loved by Heaven!

Anyhoo, I've started my small garden and I 'm getting the yard ready for all the fun we are going to have in Our back yard this year now that we are homeschooling full time. We just got a sand box and next we are putting in a tree swing!

Here's some of our spring time projects 


Bird Feeder


Egg Carton planter


What Are some of your Spring projects?

I wanna See picture, Pretty please!


Photobucket

Monday, March 21, 2011

Mini chalk board frame

So if You know anything about me, you know I HEART Chalk boards! I have 7 in my house ( just a Little obsessed ) I love that I can write the random thought that fly through My head down in what ever room of my house I'm standing in. That is very valuable to a mom that home schools.

Chalk board 1. Kitchen( all my household task's, what I'm cooking, shopping list, etc. )

Chalk board 2. The kids easel( usually in the kitchen to assist with school work or in the playroom for circle time )

chalk board 3. play room ( this one is in the shape of a giant butterfly on the wall. I use it to post our daily routine )

Chalk board 4. living room coffee table( I love to write little welcome messages to guest,  love notes to my family, count downs to a holiday,  keep score for games we play or just let the kids go for it)

Chalk board  5. My Girl's bedroom door ( I like to write prayers for them on it or encouraging things about them or any kind of reminders )

Chalk board 6. My craft room ( I painted the side of my filing cabinet with chalk board paint and because it already metal it's magnetic too! I like to write down bible verses that inspire me ) 
Chalk board 7. In My bedroom ( Okay I think this is the newest addition to the bunch and it's sooooo cute! I write love notes to my hubby, it's okay you can say it, everyone together....Awwwwe! I know it's sweet )


Just so He won't forget....


My next chalk board creation will be for outside, I need one for all My gardening thoughts.


Photobucket

Friday, March 18, 2011

Craft night!

I'm very blessed to have my very own craft room and I love to share it with my friends. I love inviting over some of the girls and create till we fall asleep.
We had a great time, laughing, eating delish cupcakes in our P.J's and making bows and head bands. Seriously, it was sooooo much fun


Chrisy and Nicole, My two favorite cheese ball's! love those Girls!

Yes I look crazy here, but It was like one in the morning!

I made some amazing cupcakes for Krista's birthday

 Happy Birthday!

 She was pretty happy.


Photobucket

Saturday, March 12, 2011

Name wall art

I've been growing bored with my daughters room.
It needed a change and fast. Every Spring I try to add a little something new to every room in the house. Just to encourage change and the newness of Spring without spending a lot of money.

So I decided to cover their name art with new scrapbook paper.


I just traced the old letters, this was done in the wee hours of the morning when everyone was still asleep. So I had my giant craft light on.


All cut out


Then I slapped on some modge podge


Finished product!
Simple...

 Makenna's wall

Madison's wall
The colors worked well with the color of the wall, even though you can't tell from the picture that the wall is a light lime green. I love pink and green! 

Photobucket